AdministrateでカスタムViewを使う
前回、Administrateを使って管理画面を作りました。 今回は、Deviseを使って定義したUserを新規登録できるようにするために、Viewをカスタムする話です。
その前に、dashboardを見ていきましょう。
dashboardを掘り下げる
まず、app/dashboards/user_dashboard.rbを見てみましょう。
require "administrate/base_dashboard"

class UserDashboard < Administrate::BaseDashboard
  # ATTRIBUTE_TYPES
  # a hash that describes the type of each of the model's fields.
  #
  # Each different type represents an Administrate::Field object,
  # which determines how the attribute is displayed
  # on pages throughout the dashboard.
  ATTRIBUTE_TYPES = {
    # 略
  }.freeze

  # COLLECTION_ATTRIBUTES
  # an array of attributes that will be displayed on the model's index page.
  #
  # By default, it's limited to four items to reduce clutter on index pages.
  # Feel free to add, remove, or rearrange items.
  COLLECTION_ATTRIBUTES = [
    # 略
  ].freeze

  # SHOW_PAGE_ATTRIBUTES
  # an array of attributes that will be displayed on the model's show page.
  SHOW_PAGE_ATTRIBUTES = [
    # 略
  ].freeze

  # FORM_ATTRIBUTES
  # an array of attributes that will be displayed
  # on the model's form (`new` and `edit`) pages.
  FORM_ATTRIBUTES = [
    # 略
  ].freeze

  # Overwrite this method to customize how users are displayed
  # across all pages of the admin dashboard.
  #
  # def display_resource(user)
  #   "User ##{user.id}"
  # end
end
長いので、略と書いていますが、1つずつ説明していきます。
ATTRIBUTE_TYPES
モデルの属性(attributes)と、その型を定義するところです。自動で作れているので、基本的にいじりません。
ATTRIBUTE_TYPES = {
  id: Field::Number,
  email: Field::String,
  encrypted_password: Field::String,
  reset_password_token: Field::String,
  reset_password_sent_at: Field::DateTime,
  remember_created_at: Field::DateTime,
  sign_in_count: Field::Number,
  current_sign_in_at: Field::DateTime,
  last_sign_in_at: Field::DateTime,
  current_sign_in_ip: Field::String.with_options(searchable: false),
  last_sign_in_ip: Field::String.with_options(searchable: false),
  created_at: Field::DateTime,
  updated_at: Field::DateTime,
}.freeze
COLLECTION_ATTRIBUTES
一覧画面で表示される属性を定義します。 デフォルトの状態だと、暗号化されたパスワードを表示しているはずですが、そんなものを表示しても仕方ないので、 ログイン回数と最終ログイン時間、最終ログインIPを表示してみましょう。
COLLECTION_ATTRIBUTES = [
  :id,
  :email,
  :sign_in_count,
  :last_sign_in_at,
  :last_sign_in_ip,
].freeze
SHOW_PAGE_ATTRIBUTES
これは詳細画面で表示される属性を定義します。こちらでも、デフォルトだと暗号化されたパスワードが表示されています。 なので、表示しても仕方ないので削除しています。
  SHOW_PAGE_ATTRIBUTES = [
    :id,
    :email,
    :reset_password_token,
    :reset_password_sent_at,
    :remember_created_at,
    :sign_in_count,
    :current_sign_in_at,
    :last_sign_in_at,
    :current_sign_in_ip,
    :last_sign_in_ip,
    :created_at,
    :updated_at,
  ].freeze
FORM_ATTRIBUTES
これは、フォームで編集可能にする属性を定義します。
Deviseを利用している場合、管理者が編集可能であってほしい項目は、メールアドレスとパスワードだと思います。
しかし、Userモデル自体はpasswordとpassword_confirmationという属性はありません。
とりあえず、emailだけ残して削除しましょう。
FORM_ATTRIBUTES = [
  :email,
].freeze
Userを登録できるようにする
この状態でユーザー登録フォームを表示してみましょう。

メールアドレスしか入力できませんね。しかもパスワードがないので登録できません。
しかし、心配はいりません。administrateはカスタマイズが容易なのです!(たぶん)
カスタムビューを生成する
adminisitrateにはカスタムビューを生成するためのジェネレータがあるので、それを使います。 ドキュメントにも書いてあるので、リンクを貼っておきます。
今回は、Userモデルのフォームのみカスタマイズしたいので、1つのモデルに絞ります。
rails generate administrate:views:new User
これによって、
- app/views/admin/users/new.html.erb
- app/views/admin/users/_form.html.erb
が生成されます。先のapp/views/admin/users/new.html.erbは要らないので削除しちゃいましょう。
カスタムビューを編集する
では、app/views/admin/users/_form.html.erbを編集します。
まず、素の_form.html.erbを見てみましょう。
<%#
# Form Partial

This partial is rendered on a resource's `new` and `edit` pages,
and renders all form fields for a resource's editable attributes.

## Local variables:

- `page`:
  An instance of [Administrate::Page::Form][1].
  Contains helper methods to display a form,
  and knows which attributes should be displayed in the resource's form.


%>

<%= form_for([namespace, page.resource], html: { class: "form" }) do |f| %>
  <% if page.resource.errors.any? %>
    <div id="error_explanation">
      <h2>
        <%= pluralize(page.resource.errors.count, "error") %>
        prohibited this <%= page.resource_name %> from being saved:
      </h2>

      <ul>
        <% page.resource.errors.full_messages.each do |message| %>
          <li><%= message %></li>
        <% end %>
      </ul>
    </div>
  <% end %>

  <% page.attributes.each do |attribute| -%>
    <div class="field-unit field-unit--<%= attribute.html_class %>">
      <%= render_field attribute, f: f %>
    </div>
  <% end -%>

  <div class="form-actions">
    <%= f.submit %>
  </div>
<% end %>
長いですが、やっていることは単純で、
- カスタムビューの説明
- エラーメッセージの表示
user_dashboard.rbに定義してあるFORM_ATTRIBUTESの値からフォームを作成- 登録ボタン
です。今は、FORM_ATTRIBUTESにemailのみなので、emailしかないです。
では、このフォームにパスワード入力エリアを追加します。フォーム自動生成の直下に追加します。
<% page.attributes.each do |attribute| -%>
  <div class="field-unit field-unit--<%= attribute.html_class %>">
    <%= render_field attribute, f: f %>
  </div>
<% end -%>
<!-- ここから追加 -->
<div class="field-unit field-unit--string">
  <div class="field-unit__label">
    <label for="admin_user_password">パスワード</label>
  </div>
  <div class="field-unit__field">
    <%= f.password_field :password %>
  </div>
</div>
<div class="field-unit field-unit--string">
  <div class="field-unit__label">
    <label for="admin_user_password_confirmation">パスワード(確認用)</label>
  </div>
  <div class="field-unit__field">
    <%= f.password_field :password_confirmation %>
  </div>
</div>
<!-- ここまで -->
このようにすると、以下のような見た目になります。
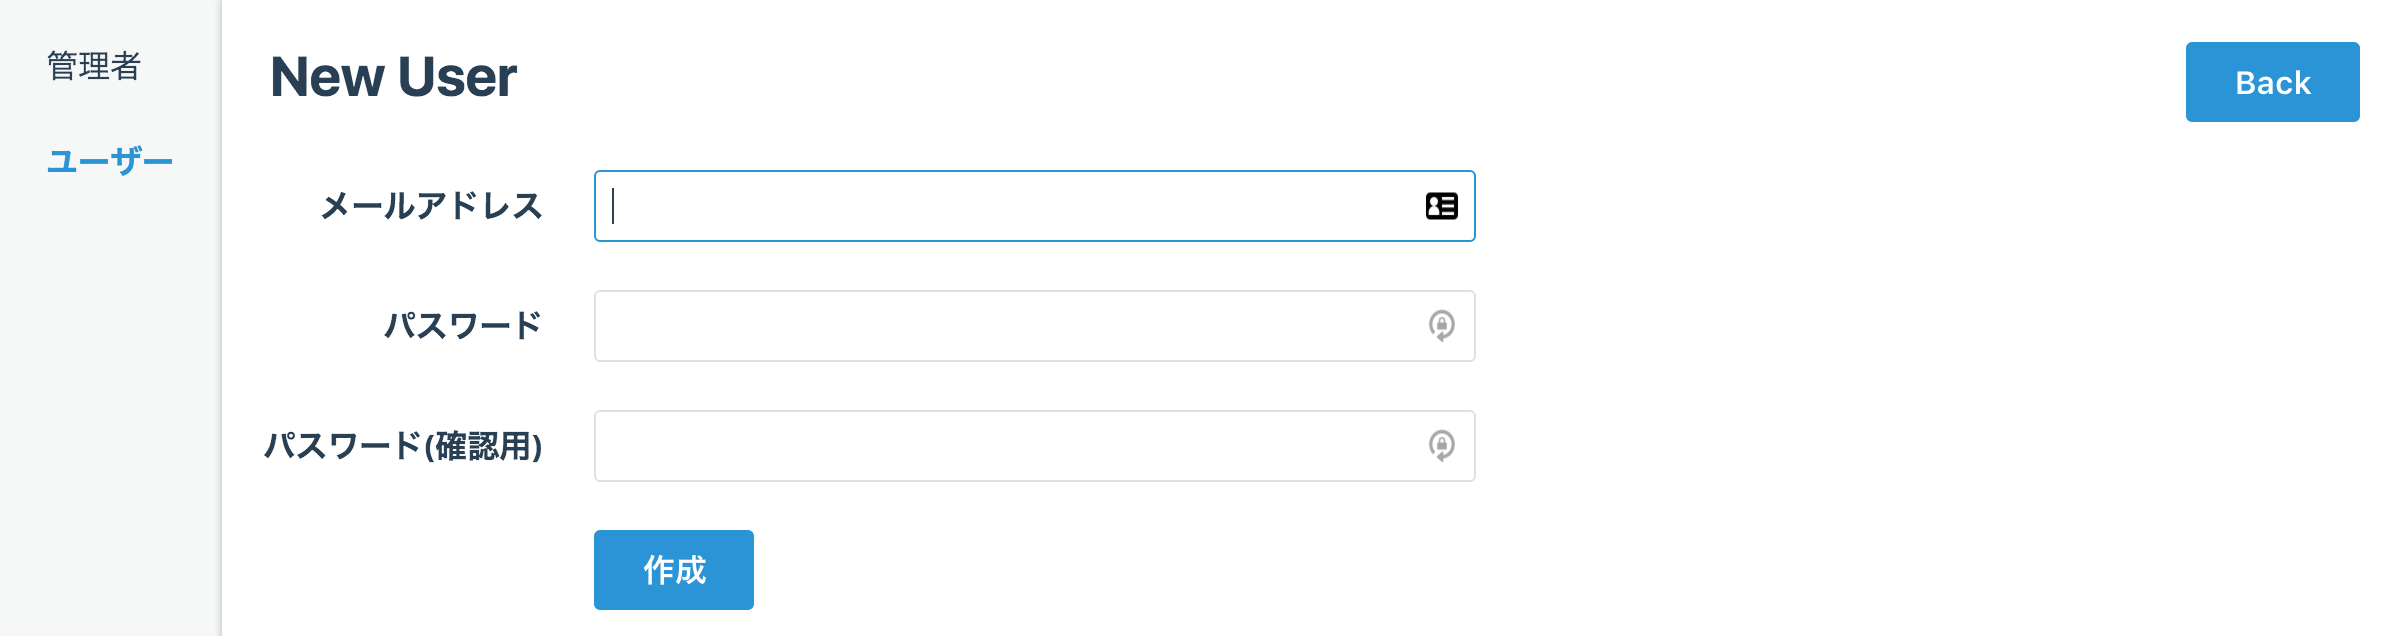
おお、なんかできた感じしますね!しかしまだ登録できません…。 そうです。Strong Parametersです。
Strong Parameters対応する
AdministrateのStrong Parametersを担当しているところを掘っていくと、
permitted_attributesメソッドが担当していることがわかりました。
そこで、permitted_attributesメソッドをオーバーライドします。
app/controllers/admin/users_controller.rbを編集します。
module Admin
  class UsersController < Admin::ApplicationController
    # To customize the behavior of this controller,
    # simply overwrite any of the RESTful actions. For example:
    #
    # def index
    #   super
    #   @resources = User.all.paginate(10, params[:page])
    # end

    # Define a custom finder by overriding the `find_resource` method:
    # def find_resource(param)
    #   User.find_by!(slug: param)
    # end

    # See https://administrate-docs.herokuapp.com/customizing_controller_actions
    # for more information

    def permitted_attributes
      dashboard.permitted_attributes << %w(password password_confirmation)
    end
  end
end
これでついに、ユーザー登録が可能になりました!
まとめ
- AdministrateのViewのカスタマイズはModel毎に行うことができる
- Strong Parametersの処理を追加するのを忘れないようにすること
- カスタマイズに独自の流儀が要らないので、自由度が高い!